
Job templates exist to allow you to easily store the description details for various categories of jobs within your organization.
Instead of copying and pasting text from job descriptions every time you need to post a similar job in the ATS, you can instead use job templates as a foundation for quickly and easily creating live job listings in the future. If there are then slight differences between similarly-named job listings, like location, junior vs. senior-level title, benefits, etc., all you will need to do is edit the individual job listings...rather than the "master" job template text. However, if more significant changes are made to descriptions for a job category...changes that should be reflected on all future job listings for that category, then you will want to edit the job template, itself, so that you will have the updated text/details already in place whenever you create future individual job listings based on that job template.
Here's how to create a job template in ATS. NOTE: Only the following levels of system users can create new job templates:
- Administrators (both Basic & Master)
- Posting Manager - If optionally selected when setting up an individual's login credential. NOTE: Viewing Managers and Non-Posting Managers do not have access to create job templates.
Step 1: Log into the ATS and navigate to the "Job Templates" tab within the "Jobs" Dashboard. Click the green plus sign icon.

- Admin Only
- Default Job Title and Description for Career Site
- Default Job Board Ad Title and Description
- Default Job Classifications
- OPTIONAL: Predictive Index Integration
NOTE: Fields marked with an asterisk (*) are required fields.
Step 2: Complete the "Admin Only" Section

- Active - This field controls whether this job template will show up in your active list on the "Job Templates" tab within the Jobs Dashboard once saved. If you were to choose "No," then the template would save to archived status and you could view it within the archived list of job templates. While normally you will select "yes," if you are building out templates for use in the future, you might be inclined to choose no, and then unarchive the job template in the future when you find that you are ready to use it.
- Admin Note - You may optionally enter notes into this text box that only users will see. This information is not visible to applicants that apply to job listings created from this job template.
- Show this template on Common Job Titles for SEO - This field will be visible if you are a client using our Premium services arrangement. We advise you to always keep this marked as "Yes" as it will only improve the rankings for your job listings and jobs portal in external search engines. For more information about how we improve your listings' search rankings naturally, read Search Engine Optimization (SEO) Feature - aka How to Get More Applicants.
Step 3: Complete the "Default Job Title and Description for Career Site" Section
In this section, you will control the job description content that is visible to visitors to your external careers portal/jobs page. This description lives on your ATS site (yourcompany.hirecentric.com/jobs).
Career Site Ad Title* - This required field is the general title of this template.
- Career Site Ad Description* - This required area is composed of the content of your job template. Since templates are the "cookie cutters" for your job postings, the actual job postings will be customized with any minor details that are different from the template in which the post originated. If you want to use the text from a job description in a Microsoft Word document, it is important that you completely remove the Word document's formatting before clicking one of the paste options on the formatting editor in the ATS. For detailed directions, read Pasting Text from Word into HireCentric Job Description Area to choose the method best for you. Once you have removed the formatting of the text from a Word document, paste the text into the ad description box. To expand this box, click and drag the bottom right corner of it. Once the text has been pasted in the box, use the WYSIWYG editor to re-format the text with the formatting features you prefer. (WYSIWYG is an acronym for "What You See Is What You Get".)
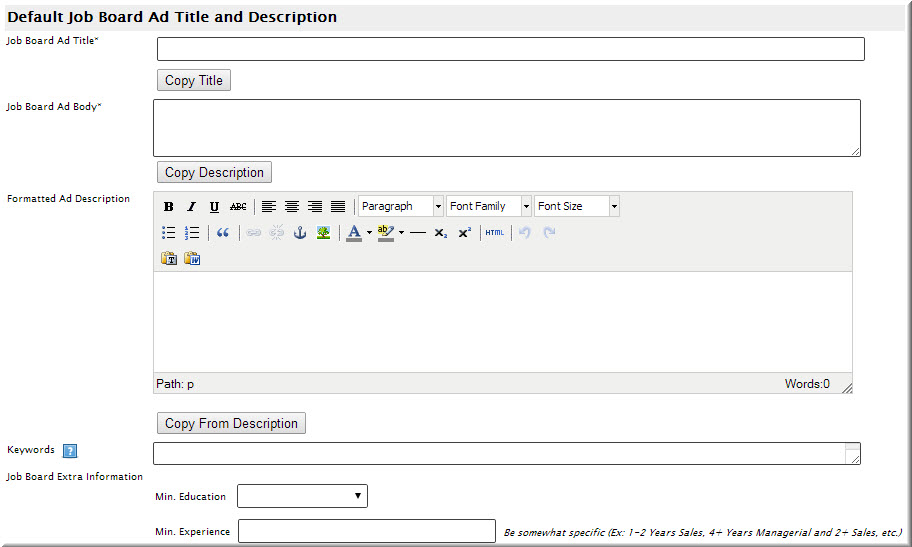
- Step 4: Complete the "Default Job Title and Description for Career Site" Section
In this section, you will control the job description content that is visible to individuals who view your job listing on an external job board. This description lives on external job board sites (when applicable). - Job Board Ad Title* - To quickly add this field, click the "Copy Title" gray button after you have completed Step 3. Or, if you prefer to use a different title for your job on external job boards, put a new title here. For example, a job may be called "Business Development Consultant" when viewed on the jobs page of your ATS; however, you may opt to advertise the listing on external job boards as "Sales Consultant - Unlimited Earning Potential!"
- Job Board Ad Body* - To quickly add content to this field, click the "Copy Description" gray button after you have completed Step 3. By clicking the button, you will automatically populate the content with the same text as you entered for the description area on your own careers site. Or, if you prefer to use a slightly different description for your job on external job boards, make changes to the text in this area. NOTE: This box does not support formatting and will be used by certain job boards that don't carry over formatting tags. If you copy the text from above, take care to review the copied text to ensure that the line breaks appear as you wish. If you make edits to the career site version of the text that should be reflected on job boards, as well, take care to select the "Copy Description" button to update this box whenever appropriate.
- Formatted Job Description - To quickly add content to this field, click the "Copy From Description" gray button after you have completed Step 3. By clicking the button, you will automatically populate the content with formatting that will be recognized by online job boards (that support formatting tags) once job postings are pushed to the job boards. Or, if you prefer to use a slightly different formatted description for your job on external job boards, make changes to the text in this area. If you make edits to the career site version of the text that should be reflected on job boards, as well, take care to select the "Copy From Description" button to update this box whenever appropriate.
- Keywords - Some, but not all, external job boards will associate specific keywords with job listings based on your input as the job poster. Keywords entered here should reflect the scope of the position. You can use multiple words to better disseminate the role through various user searches. (Example: For Sales Manager, you could use both the words "Sales" and "Manager" to increase your potential for more prominently displaying your job listing in the search results for candidates keying in words such as "Sales" and "Management.").
- Job Board Extra Information - If you would like to set minimum education requirements, click on the triangle to display choices in this drop down box, and choose your requirement. To create minimum experience requirements, it is best to specify the years of experience you are seeking as well as the type of experience. Take into consideration how the scope of your minimum requirements in these fields can impact your applicant volume and make adjustments as necessary.
Step 5: Complete the "Default Job Classifications" Section
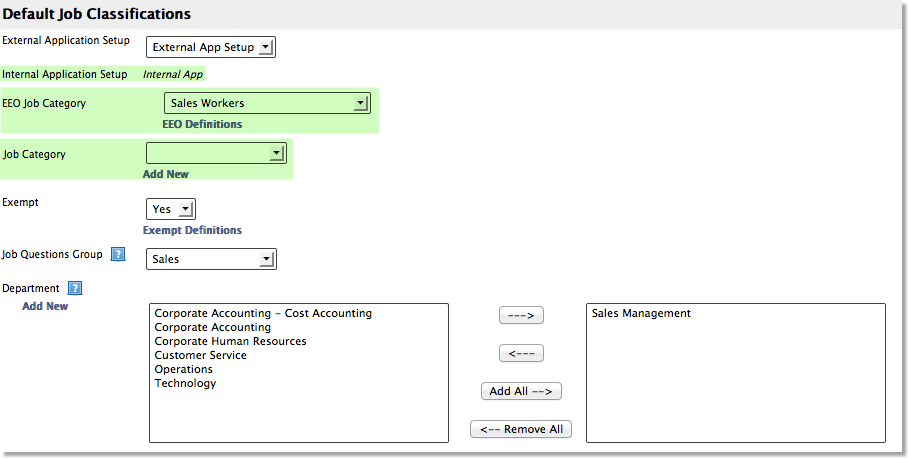
- External Application Setup - This drop down box lets you choose which external application version should be attached to this job template (i.e. which application will individuals be presented when they apply to a job listing created from this job template). If you only have one external application associated with your portal, then the default will appear as read-only text. Otherwise, choose your preferred external application (i.e. External App Setup, Two-Step App, etc.). FYI - The Two-Step Application is a great way for companies to utilize a job application with a shorter first step in order to get vital information from applicants in hot demand...first to determine whether to pursue a candidate further, and also to acquire information from higher level candidates.
- Internal Application Setup - OPTIONAL - If you have created an Internal Application, this drop down box will let you select the Internal Application you want to affiliate with this role. If you have only one internal application associated with your portal, then the default will appear as read-only text.
- EEO Job Category - OPTIONAL - If your application has a voluntary EEOC section enabled, then this field will appear to allow you to select the EEO Job Category that most accurately describes this job template. You may click the "EEO Definitions" link to view a list of category definitions.
- Job Category - OPTIONAL - If you have job categories enabled for your portal, then you may use this drop-down box to select the category option that most closely describes this job template. For more information, read Optional Job Categories.
- Exempt - This drop down box allows you to select "Yes", "No" or "N/A" as to whether this role is Exempt in order to be cognizant of the Fair Labor Standards Act (FLSA).
- Job Questions Group - If you have Job Specific Screening Questions created, you can attach those to the template. Job Specific Screening Questions offer you the chance to ask the candidate position-specific questions that are the "dealbreakers" for the role. If you assign a group of Job Specific Screening Questions to a role, each applicant must answer them when applying for the role.
- Department* - Each template must be assigned to at least one department/business unit. It is possible for a template to be applicable for multiple departments. To assign a department to the template, click on the applicable department(s) on the left box and then click the arrow pointing to the right to move the department(s) to the box on the right. If you want this template to be applicable for all departments, click on the "Add All" button. If you have a department(s) listed in the right hand box that you do not want affiliated to this template, simply click on the department(s) and then click on the arrow pointing to the left to remove the department(s). Posting Managers, Basic Administrators and Master Administrators will have access to templates within their assigned business unit(s).
OPTIONAL: Predictive Index Integration
This section will only appear in the job template window if your site has the Predictive Index integration enabled.

- Assign - Choose the name of your organization's Predictive Index account from the drop-down box.
- When to Give - This drop down box gives you the option of either prompting applicants to take the Predictive Index at the time of application; or, manually inviting them via email to complete it later in the application process.
- Give Predictive Index On Short Applications? - If you have the optional Two-Step Application feature enabled, you will have the option to choose whether you would like the applicant to complete the Predictive Index during the Short Application (first part of the Two-Step Application).
Step 6: Save Your Job Template

- Save Template - This button will save your template without prompting you to create an subsequent associate job listings. You can always create job listings based on this template later from the job listings tab.
- Save and Create Job Listing - Choose this button if you wish to save the job template and then automatically be prompted to create a new job listing based on this template.
- Cancel - Choose this button only if you wish to discard changes to this job template.