This feature diminishes the redundancy of data entry from the I-9 through the E-Verify process. If you are interested in this feature, please reach out to your Sales Agent or Service Team member for more information about the steps involved in adding E-Verify to your OnboardCentric portal.
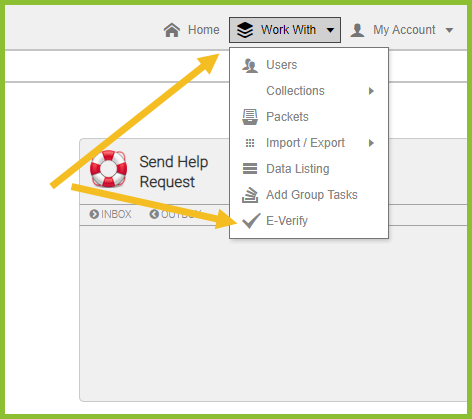
Where do I find E-Verify within my site?
A designated User can find E-Verify in their Work With > E-Verify navigation menu. If the user cannot see E-Verify, then they do not have the appropriate Role permissions.
What are the components of E-Verify within my site?
Within E-Verify within OnboardCentric, there are various screens designated by buttons at the top of the page. These designated pages consist of:
- Unevaluated
- In Process
- Action Required
- Completed
- Not Required
The way to identify which screen you are reviewing is by the red dot next to the title of the button. For example, if the red dot is next to the title Unevaluated in that particular button, then you are reviewing the unevaluated cases.
Unevaluated
The Unevaluated screen will give you a list of all employees who have completed the I-9 and who have had their I-9 approved, and are ready to be sent through E-Verify. This screen will allow you three options:
- Mark as Not Needed - This is used when a new hire’s employment is terminated before they begin work and running E-Verify on the new hire is no longer necessary.
- Submit to E-Verify - This submits the information directly to the E-Verify system using information from the I-9. If there are additional immediate questions, the will appear on screen.
- View I-9 - This will populate the new hire’s completed I-9 in another screen to allow you to toggle between the completed I-9 and any information within OnboardCentric that might be appearing. Occasionally you will be asked to verify information, so it is always a best practice to have the completed I-9 handy in another screen.
* In order for any of these actionable buttons to be used, an employee’s name must first be selected.
If an employee appears on this list twice, that means they have two completed I-9s. The extra case line should be marked as 'Not Required' prior to navigating to the employee’s record (Work With > Users > Employee’s name), and deleting the incorrect I-9. If you delete the I9 first, the case will not be accessible through OnboardCentric.
In Process
Occasionally an E-Verify case will land in the In Process screen. Typically this is because of a delay on the behalf of the Department of Homeland Security (DHS) or a Tentative Non-Confirmation (TNC) where the employee needs to contact the Social Security Administration (SSA). This screen will allow you two options:
- Get Case Update - This will allow you to follow directions given by the USCIS to 'Check Back Later'. Whenever you see this message simply highlight the specific case and click the button to 'Get Case Update'. The case results will then appear.
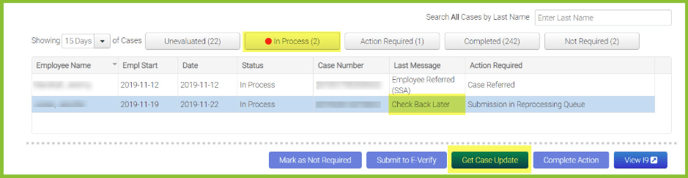
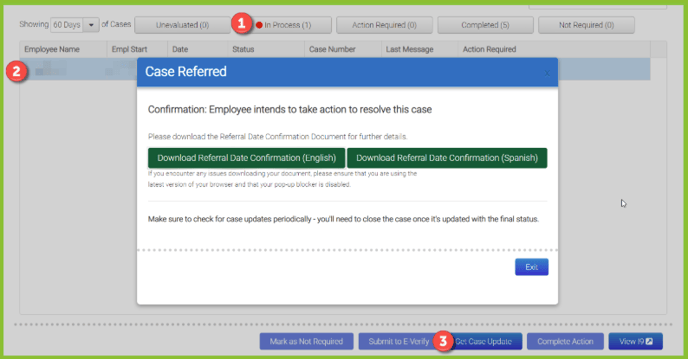
- Case Referred to SSA - Provide the notice to your employee and continue to check for updates.

- View I-9 - This will populate the new hire’s completed I-9 in another screen to allow you to toggle between the completed I-9 and any information within OnboardCentric that might be appearing.
Action Required
If there are further steps to be taken, a case can land on the Action Required screen. This screen allows you three options:
- Complete Action - If the action required column mentions anything other than “close case” you would use this button to move the case forward in the manner described. Additional steps could appear on screen.
- View I-9 - This will populate the new hire’s completed I-9 in another screen to allow you to toggle between the completed I-9 and any information within OnboardCentric that might be appearing.
Completed
All completed E-Verify cases that have run through OnboardCentric can be found on the Completed screen. This screen allows you one option:
- View I-9 - This will populate the new hire’s completed I-9 in another screen to allow you to toggle between the completed I-9 and any information within OnboardCentric that might be appearing.
Not Required
Any cases marked as Not Needed from the Unevaluated tab will fall onto the Not Required screen. This screen allows you one option:
- View I-9 - This will populate the new hire’s completed I-9 in another screen to allow you to toggle between the completed I-9 and any information within OnboardCentric that might be appearing.