
In this tip sheet, we will discuss the following items in order to allow you to become better acquainted with the HireCentric ATS.
Application Process - understand what your applicants experience while completing an application
Website Addresses - accessing your ATS portal
Dashboards - understand the user interface
Applicant Search - learn how to quickly locate your applicants
Symbols - review a legend of the various icons used through HireCentric
Applicants - learn about various operations that may be completed when reviewing applicants
Jobs - identify the tabs within the Jobs Dashboard
To Post a Job - understand job board basics
Job Screening Questions - add job-specific screening questions to job listings
Reports - familiarize yourself with the reporting interface
Settings - customize certain aspects of your site to your own preferences
Users - understand the different levels of user access
To Create a Login - learn how to create a new user login credential
APPLICATION PROCESS
When applicant is ready to apply, he/she simply goes to your company web page and clicks on your Careers or Employment link. That link should be redirected to your company-specific HireCentric ATS URL address. The ATS site is where the applicant will view open job listings and enter personal information (Name, Address etc.) to create a candidate profile.
Once one has set up his/her login (aka candidate profile), the applicant may apply for an open position. There is a place on the application where the applicant may paste in a text resume or upload a resume for the position. The applicant may apply for more than one position; however, he/she will not be able to apply multiple times to the same position.
Once the application is submitted, a no-reply email will be sent thanking the applicant for applying, and he/she will also see an on-screen confirmation message.
Benefits
- Applications will be posted on free Internet job boards; thus, promoting your employment needs to a larger audience.
- More in-depth screening of applications may begin before the interview with the use of screening questions. The questions may be tailored to be job-specific, and answers for certain types of questions may be set up to automatically disqualify an applicant, or assign points to an applicant. This makes the screening process more efficient and consistent.
- It eliminates the need to print and store paper applications.
- The applicant information is secure.
- Documents (background information, signed paperwork, etc.) and notations can be uploaded by HR Admins and attached to applicant records. This type of information cannot be deleted once added to the applicant’s record.
WEBSITE ADDRESSES
To log in to the administrative side of the site, visit https://admin.hirecentric.com and enter your log in name and password.
To view your site, visit https://yourwebsite.hirecentric.com, where the “yourwebsite” portion of the link is the same as your company’s website. For example, ExactHire’s site would be https://exacthire.hirecentric.com.
DASHBOARDS
Once you are logged in, please note that the various icons at the top of the site link to the Dashboards. Each icon represents a different Dashboard. Within each Dashboard, various items are typically broken into smaller pieces by tabs. The above image is what an Administrator level user would see. If you are not an Admin level user, you may not see all items listed throughout this tip sheet.
APPLICANT SEARCH
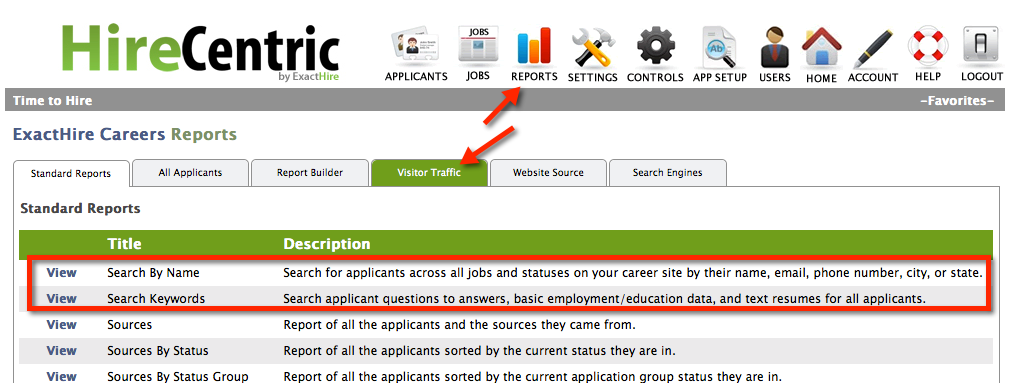
While you can easily search for applicants by job listing, and via the Applicant Dashboard, sometimes you need to search for specific people without knowing the job listing to which they applied. To do searches of your entire applicant population by name and/or keyword, access the Reports Dashboard and click on the Standard Reports tab. The first two standard reports pictured below will help you locate applicants, as well.
SYMBOLS
The following symbols can be found in many different areas in the application, but they are consistent throughout the entire site in regards to their meaning: Add (add login, screening questions etc.)
Edit (view and change the set up)
Archive (remove from active view). Items can only be archived, not deleted
Unarchive (add to active view)
Add an applicant - can be added to a job manually on the site
Ad Tracking - see from what website you are receiving the most responses
Push to the job boards
Delete
Forward an application
Calendar an event (interview, call, etc.)
Spotlight an application
Print an application
APPLICANTS
Using the drop down, you may select a job for which you would like to see the applicants or you may click on the job title to see applicants. Once in this view, you may sort the applicants based on date, basic qualifications, score, status, etc.
By clicking on an existing application, you may:

- view/edit the applicant’s information
- forward applicant to an individual
- send emails to the applicant
- assign an applicant status
- print out application
- spotlight it for another user
- make notes and documentation
- set up reminders or interviews on calendar
- copy applicant to another job posting
JOBS
Within the Jobs Dashboard you have four tabs:
- Screening Questions - allows you to create specific groups of questions that you may add to specific job listings; these are your “deal-breaker” questions and are specific to an individual position and should not be confused with the standard application questions asked of all applicants regardless of which job to which they are applying.
- Job Template - allows you to create specific job templates quickly and easily for use when posting job listings. For more information, see How to Create a Job Template.
- Job Listing - allows you to create a job listing using the Job Templates and Screening Questions that were created in the previous two tabs. Also, provides you with an overview of all of the jobs you have posted.
- Job Board Favs - allows you to store links to the job boards of your choice and also quickly see what the cost is to post a job on that board.
TO POST A JOB
Click on the Jobs Dashboard icon at the top of the page and it will place you immediately on the Job Listings tab and show you a listing of the jobs currently active. Click on the green plus symbol to add a job. It will bring up a Job Template drop down box with existing templates listed. Choose the template you want to use and then complete the job listing information.
If there is not a template for the position you wish to fill, you can create one by clicking on the Job Template tab. Click on the green plus symbol to add a template. Complete the form information and submit.
Note: On the form it will have a button to click to paste a Word document. Use only the button to paste and not the regular keyboard shortcuts. The button will remove all of the formatting from the Word document so that it does not conflict with the formatting in the web-based portal – essentially, it makes it plain text. Then, you may use the formatting buttons in the portal to apply your desired formatting (i.e. bolding, bullet points, etc.).
JOB SCREENING QUESTIONS
You may add job screening questions to a Job Listing by adding an existing Job Question Template to the Job Listing form or creating the screening questions under the Jobs Dashboard icon found at the top of the site and choosing the Screening Questions tab.
Click on the green plus symbol to create a title for the screening questions. Under the title, you can click the green plus symbol to produce a question form shown below:
Job Scoring - Scores can be added to questions to help narrow your applicant pool. The applicant with the best score would be seen over lower scoring applicants.
Disqualifier - You can also assign a disqualifier should you receive an answer that would automatically make the applicant not qualified for the position.
Answers Type - You may choose from the following different types of questions:

- Small Text
- Large Text
- Drop Down
- Option Button
- Yes/No
- Checklist
REPORTS
Below is a listing of standard reports set up on the Reports Dashboard:

- Report Builder - allows you to customize your own reports using report builder to meet your specific needs.
- Visitor Traffic - details how many people have visited your career site, how long they viewed, as well as if they started or completed an application. You can view Full Analytics at the bottom of this page.
- Website Source - details which websites directed the applicants to your career site. This information can assist you when deciding whether to add or remove job posting sites.
- Search Engines - details which search engines applicants are using to find your career site and what keywords they are using
SETTINGS
Under settings, you may do the following:
- Create and customize pages for your site
- Create classifications to help organize your job postings by Employment Type or Job Board Classifications
- Add/remove business units (departments, divisions, etc)
- Create Ad Sources you would like applicants to be able to select to indicate where they heard about the job listing. These can be easily added/removed as your needs change
- Create the Application Statuses (i.e. categories) you need to organize the steps in your hiring process. This helps track the status of all your applicants and allows you to run reports. This is also the label that serves as an applicant’s “disposition” for a certain position should you be subject to Affirmative Action Plan reporting.
- Create email templates to help realize efficiencies when emailing applicants - such as sending them a survey/test for qualification, requesting an in-person interview, etc. This is customizable to meet your needs.
- Add contact emails to quickly forward applicants to Managers who do not currently have their own login.
USERS
There are various types of users allowed in HireCentric. Based on your assigned user type, you may not be able to view certain features or perform certain actions. Keep this in mind as you maneuver through the system.
Found on the User Dashboard, there are three types of Users - Admins, Managers, Assigned Users.
Administrators - These Users have access to all parts of the system

Managers - This restricted User will only have access to a specific business unit/department (or group of business units). Within the Managers level, there are Posting Managers, Non-Posting Managers and Viewing Managers:
- Posting Manager - This restricted user has the ability to view applicants, change status codes, AND post jobs
- Non-Posting Manager - This restricted user has the ability to view applicants, add notes to applicant records, archive applicants and spotlight applicants to other users; this user cannot post jobs
- Viewing Manager - This restricted user has the ability to view applicants, and may optionally change status codes and add notes if designated; this user cannot post jobs or archive/spotlight applicants
Assigned Users - This restricted User will only have access to individual applications to which he/she is assigned.
TO CREATE A LOGIN
Click on the User Dashboard, select the appropriate tab, and click the green plus icon. If a username or email address has already been used within the system, it will not let you add that user. Either use a different username, or go to that user’s application and enter a fictitious email address so that you may use the appropriate email address for the login information.